Ego Thread Adapters: Bridging the Gap for a Seamless Vaping Experience
Ego Thread Adapters: Bridging the Gap for a Seamless Vaping Experience
In the dynamic world of vaping, innovation and compatibility go hand in hand. Enter ego thread adapters, a vital component that ensures your vaping experience remains adaptable and versatile. In this comprehensive guide, we'll shed light on ego threading, its continued relevance in today's vaping landscape, and how ego thread adapters bridge the gap between different devices, ultimately enhancing your vaping journey.

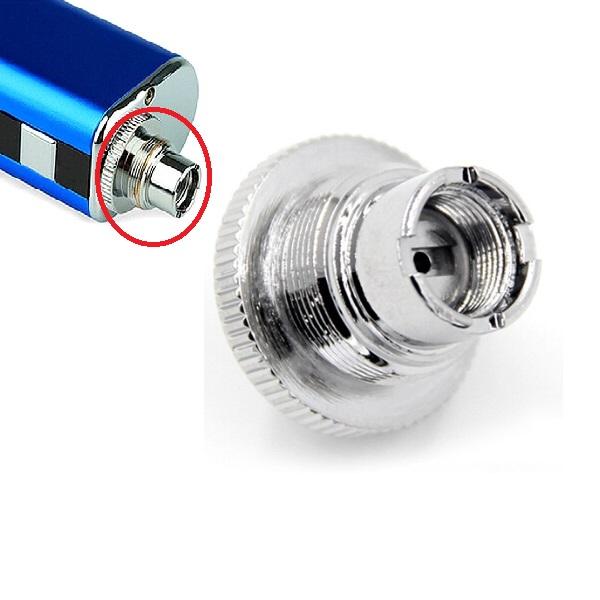
510 EGO Threading
Understanding Ego Threading
Ego threading is a threading standard that has been a stalwart in the vaping industry for years. It was originally designed to accommodate smaller, ego-style batteries and tanks, offering a user-friendly and reliable connection. Ego threading is characterized by its exterior threads and recessed inner threads.
Why Ego Threading Matters
Despite the rise of 510 threading, ego threading remains relevant for several reasons:
- Ease of Use: Ego-threaded devices are typically designed for simplicity, making them ideal for beginners and those who prefer straightforward setups.
- Versatility: Ego threading allows for the use of a variety of tanks and atomizers, giving vapers the freedom to experiment with different vaping styles.
- Compatibility: Many older and some current vaping devices still utilize ego threading, making it essential for those who have a collection of ego-threaded tanks and batteries.

The Role of Ego Thread Adapters
Seamless Device Compatibility
Ego thread adapters are the unsung heroes that bridge the gap between ego-threaded tanks and 510-threaded devices. By using an adapter, you can connect an ego-threaded tank to a 510-threaded battery or vice versa, ensuring that your favorite components are compatible regardless of their threading.
Enhancing Your Vaping Experience
Ego thread adapters open up a world of possibilities, allowing you to mix and match different components to create your ideal vaping setup. For example, you can use an ego-threaded tank with a high-capacity 510-threaded battery, combining the benefits of both components for a customized experience.
How to Use Ego Thread Adapters
Step-by-Step Guide
Using an ego thread adapter is straightforward. Follow these steps for a secure and hassle-free connection:
- Identify the Thread Types: Determine whether your tank and battery have ego or 510 threading.
- Choose the Right Adapter: Select an ego-to-510 or 510-to-ego adapter based on your needs.
- Attach the Adapter: Screw the adapter onto the tank or battery, ensuring a snug fit.
- Connect the Components: Attach the other component (tank or battery) to the adapter, ensuring a secure connection.
Compatibility Tips
When using ego thread adapters, consider the following compatibility tips:
- Voltage Compatibility: Ensure that the voltage output of your battery is suitable for the tank you're using.
- Device Type: Some devices may have specific voltage or wattage requirements. Check the specifications to ensure compatibility.
- Thread Quality: Inspect the threading on both the adapter and the device to ensure they are in good condition for a secure connection.
Maintenance and Care
Cleaning and Maintenance
Proper maintenance of your ego thread adapters is crucial for ensuring their longevity and performance. Follow these tips:
- Regular Cleaning: Firstly, clean the threads of the adapter and your devices regularly to prevent residue buildup, which can affect connectivity.
- Use a Soft Cloth: Secondly, wipe the threads with a soft cloth or a cotton swab dipped in isopropyl alcohol to remove any debris or e-liquid residue.
- Avoid Over-Tightening: Thirdly, when attaching the adapter, ensure a snug fit but avoid over-tightening, which can damage the threads.
Storage
Proper storage of your ego thread adapters is essential to protect the threading and maintain their effectiveness. Here are some storage tips:
- Use a Case: Store your adapters in a small case or container to prevent them from getting lost or damaged.
- Keep Them Dry: Ensure that the adapters are stored in a dry place to prevent corrosion or rusting of the threads.
- Avoid Dust and Debris: Store the adapters in a clean environment to prevent dust and debris from accumulating on the threads.

For a detailed video about 510 EGO Thread Adapters watch this video on Mist YouTube channel!
How Ego 510 Thread Adapters Work Perfectly for the Eleaf Mini iStick
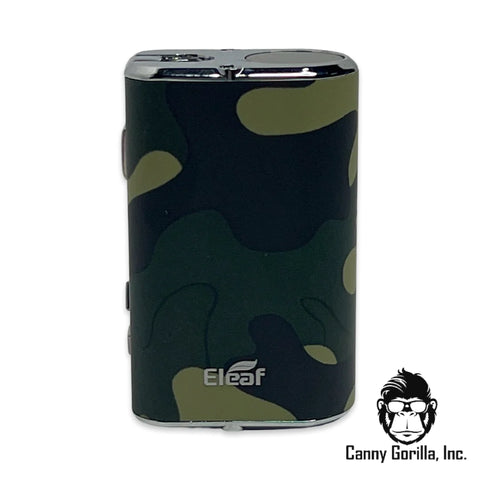
Eleaf Mini iStick
The Eleaf Mini iStick is a compact and versatile vaping device known for its portability and performance. It features 510 threading, which is the current standard in the vaping industry. However, with the use of ego 510 thread adapters, you can enhance its compatibility with a wide range of tanks and atomizers.
Why Use Ego 510 Thread Adapters with Eleaf Mini iStick?
The Eleaf Mini iStick, with its 510 threading, is already highly versatile. However, the addition of ego 510 thread adapters offers several benefits:
- Increased Compatibility: By using an ego 510 thread adapter, you can connect ego-threaded tanks to the Mini iStick, expanding your options for tanks and atomizers.
- Customization: The adapter allows you to experiment with different tank and battery combinations, enabling you to customize your vaping experience.
- Versatility: Whether you have an old favorite ego-threaded tank or a newer 510-threaded one, the adapter ensures you can use both with the Mini iStick.
Step-by-Step Guide to Using Ego 510 Thread Adapters with Eleaf Mini iStick
- Select the Adapter: Choose a high-quality ego 510 thread adapter.
- Attach to Mini iStick: Screw the adapter onto the 510 threading of the Mini iStick.
- Connect the Ego-Threaded Tank: Attach your ego-threaded tank to the adapter, ensuring a secure connection.
- Check for Compatibility: Ensure that the voltage and wattage settings on the Mini iStick are compatible with your ego-threaded tank.
Benefits of Using Ego 510 Thread Adapters with Eleaf Mini iStick
- Enhanced Flexibility: The adapter allows you to switch between different tanks and atomizers without being limited by threading standards.
- Cost-Effective: Instead of purchasing new tanks or batteries, the adapter allows you to use your existing components, saving you money.
- Improved Vaping Experience: The ability to mix and match tanks and batteries ensures you can create a setup that meets your specific vaping preferences.
Deep Dive into the Eleaf Mini iStick
Overview of Eleaf Mini iStick 10W Box 1050mAh
The Eleaf Mini iStick 10W Box 1050mAh is a small but powerful device, making it an excellent choice for vapers who prioritize portability without sacrificing performance. Here are its standout features:
- Compact and Portable Design: Easily conceals in the palm of your hand, perfect for on-the-go vaping.
- Built-in 1050mAh Battery: Offers long-lasting battery life, ensuring you can vape throughout the day.
- Variable Voltage (VV) Mode: Adjustable voltage from 3.3V to 5.0V, allowing you to find your perfect heat setting.
- LED Screen for Easy Monitoring: Displays important information such as voltage settings and battery life.
- Power Range: 1W to 10W, providing flexibility in power output.
- User-Friendly Controls: Simple controls for adjusting settings and powering the device on or off.
- Over-Discharge Protection: Ensures safety by preventing battery damage from over-discharge.
- Ergonomic and Pocket-Friendly: Designed for comfort and ease of use.
- Wide Compatibility: Fits both 510 thread and ego thread tanks, enhancing its versatility.
How to Use the Eleaf Mini iStick 10W Box 1050mAh
Step 1: Charging
Firstly, before using your Eleaf Mini iStick 10W, ensure it's adequately charged. Secondly, connect the included USB cable to the device and plug the other end into a USB charger or computer. Finally, the LED light will glow red while charging and turn green once fully charged.
Step 2: Power On/Off
To turn the device on, press the power button five times in quick succession. The LED light will flash to indicate that the device is now active. To turn it off, repeat the process – press the power button five times quickly, and the LED light will flash to indicate that the device is now powered off.
Step 3: Adjust Voltage
The Eleaf Mini iStick 10W allows you to adjust the voltage to customize your vaping experience. Press the "+" or "-" buttons to adjust the voltage. The voltage is adjustable by 0.1V increments from 3.3V to 5.0V. The LED screen will display the current voltage setting.
How to Use the Eleaf Mini iStick 10W Box 1050mAh Continued...
Step 4: Filling the Tank
The Eleaf Mini iStick 10W is often used with a compatible tank, such as the Eleaf GS Air. To fill the tank, unscrew the base or top cap, depending on the tank's design. Subsequently, carefully fill your e-liquid into the tank, avoiding the central airflow tube. Be sure not to overfill it, as this can lead to leaking. Once filled, screw the base or top cap back on securely.
Step 5: Attach the Tank
Thread the tank onto the Eleaf Mini iStick 10W, ensuring it's securely attached but not overtightened.
Step 6: Vaping
Press and hold the power button while inhaling through the mouthpiece of your tank. The device will vaporize the e-liquid in the tank, providing a satisfying vape.
Step 7: Maintenance
Regularly clean and maintain your tank to ensure optimal performance. Disassemble it, clean the components, and replace the coil as needed.
Step 8: Charging Again
When the battery runs low, it's time to charge your Eleaf Mini iStick 10W again. Simply connect it to a charger, and the LED light will indicate the charging status as mentioned in Step 1.

Troubleshooting: Eleaf Mini iStick Not Working?
If your Eleaf Mini iStick isn't turning on or you're looking for a reset, follow these steps:
Comprehensive Five-Step Reset Guide
- Turn Off the Battery: If the device is on, turn it off by quickly pressing the power button six times in a row.
- Charging: Connect the battery to the charger and let it charge for about 10 to 15 minutes using a compatible charger.
- Unplug Charger: After charging, unplug the charger from the battery.
- Turn On the Battery: Turn the battery back on by pressing the power button six times quickly.
- Confirm Reset: The battery should now be reset and function properly. If issues persist, contact Eleaf's customer support or refer to the user manual for additional troubleshooting guidance.
Safety Tips for Using Eleaf Mini iStick
- Never carry an unloaded battery in your pocket or purse.
- Always turn off your battery if you are carrying it in your pocket or purse.
- If your battery gets damaged or partially submerged in water, THROW IT OUT. Buy a new one.
- Always test the battery operation before each use and with each new tank.
- Never leave charging unattended. This is a great rule for most electronics and these are no exception.
- Do not use while charging. It does work but it is better to wait or remove the charger first.
For a comprehensive guide on the Eleaf Mini iStick, check out our detailed blog post here.
FAQs
Q: What is the difference between ego threading and 510 threading?
A: Ego threading features both exterior and recessed inner threads, while 510 threading is typically a single set of exterior threads. Ego threading is often found in older devices, while 510 threading is the current standard.
Q: Can I use an ego-threaded tank with any 510-threaded battery?
A: Yes, with the use of an ego-to-510 thread adapter, you can connect ego-threaded tanks to 510-threaded batteries.
Q: How do I clean my ego thread adapter?
A: Use a soft cloth or a cotton swab dipped in isopropyl alcohol to clean the threads. Avoid over-tightening to prevent damage.
The Wrap Up
Ego thread adapters are unsung heroes in the vaping world, offering the flexibility and compatibility that vapers crave. Their ability to bridge the gap between different devices, allowing you to mix and match components effortlessly, is invaluable. Most 510 thread vape box mods work seamlessly with the Ego thread adapters.
At Canny Gorilla, we're dedicated to providing you with valuable insights and information on all things vaping. Ego thread adapters represent the essence of adaptability in vaping, enabling you to create a customized experience that suits your preferences.
Stay tuned for more informative articles, product recommendations, and reviews as we guide you on your vaping journey. If you have any questions or need further assistance, don't hesitate to reach out to our expert team. Happy vaping, and may your ego thread adapters continue to enhance your vaping experience, one connection at a time!
Follow Us!